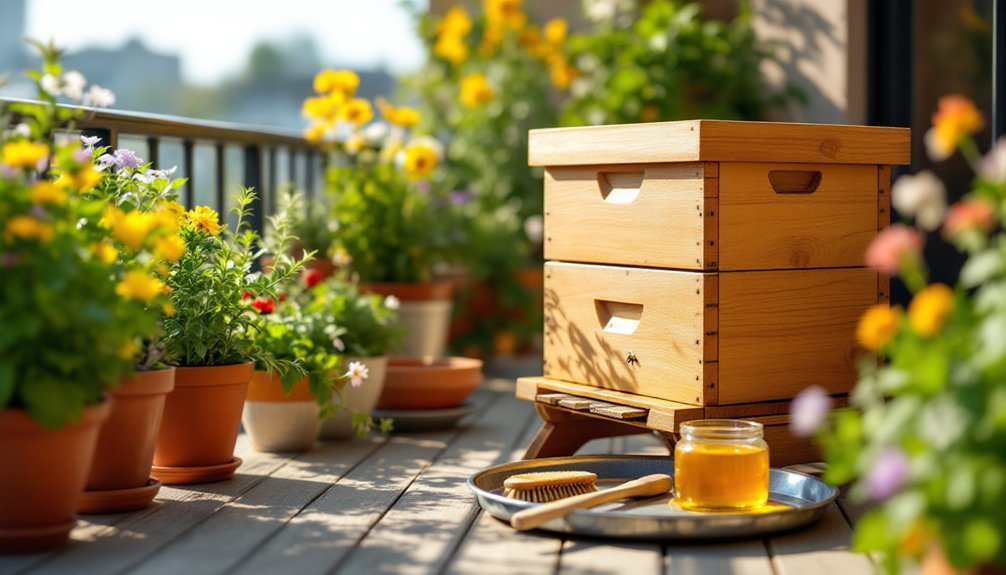
An essential urban balcony beekeeping kit should include a compact hive like a B-Box or microbeehive, a bee jacket with integrated veil, lightweight gloves, a hive tool, and a small smoker. You'll need container-friendly, bee-attracting plants and basic seasonal care knowledge. Don't forget to check local regulations before starting. A quality starter kit balances space efficiency with bee safety while keeping your neighbors comfortable with your new hobby.
Understanding the Essentials of Urban Beekeeping
While traditional beekeeping often conjures images of rural settings, urban beekeeping has emerged as a viable and rewarding practice for city dwellers. Before diving in, you'll need to understand the fundamentals that make urban beekeeping successful.
First, select a location with morning sunlight and wind protection. Your balcony should have easy access for maintenance while minimizing disruption to neighbors.
Strategic placement is essential – choose spots with gentle morning light that shield your bees while respecting your urban neighbors.
Check local regulations to guarantee beekeeping is permitted in your area.
You'll also need to provide a consistent water source nearby to prevent your bees from wandering to neighbors' pools or fountains.
Regular hive inspections are essential for monitoring colony health and addressing issues promptly. Considering the limited space constraints, you might want to explore compact hive types that are better suited for balcony environments.
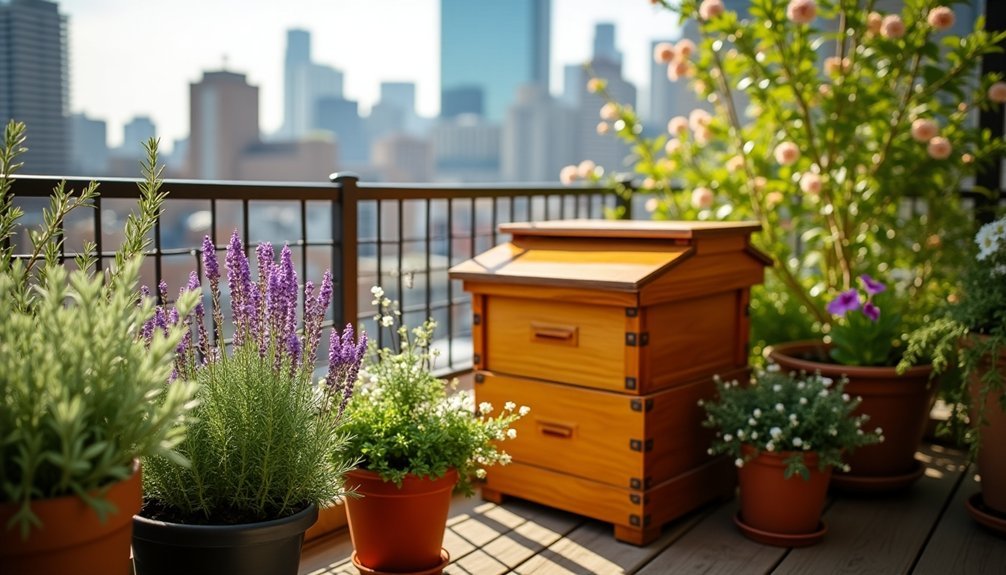
Selecting the Right Compact Hive Design for Balconies
Three critical factors should guide your choice of a compact hive design for urban balcony beekeeping: space efficiency, ease of maintenance, and bee safety.
B-Box systems offer innovative chimney designs that protect bees while entering and exiting your balcony hive. Microbeehives and mini beehives provide the smallest footprint, perfect for limited spaces while still allowing for honey production.
When selecting your hive, consider its weight and materials—lightweight options make repositioning easier if needed.
Look for designs with simple access panels for inspections and vertical configurations that maximize your balcony's limited space.
Remember to place your hive where bees can access sunlight and nearby forage, while providing a water source.
Thoughtfully placed top bar or Warre hives can accommodate urban settings while supporting local biodiversity.
The B-Box Hive's seven-foot-tall chimney design keeps bees at a safe height during hive access, making it ideal for balcony beekeeping where space is shared with humans.
Protective Gear for City Beekeepers
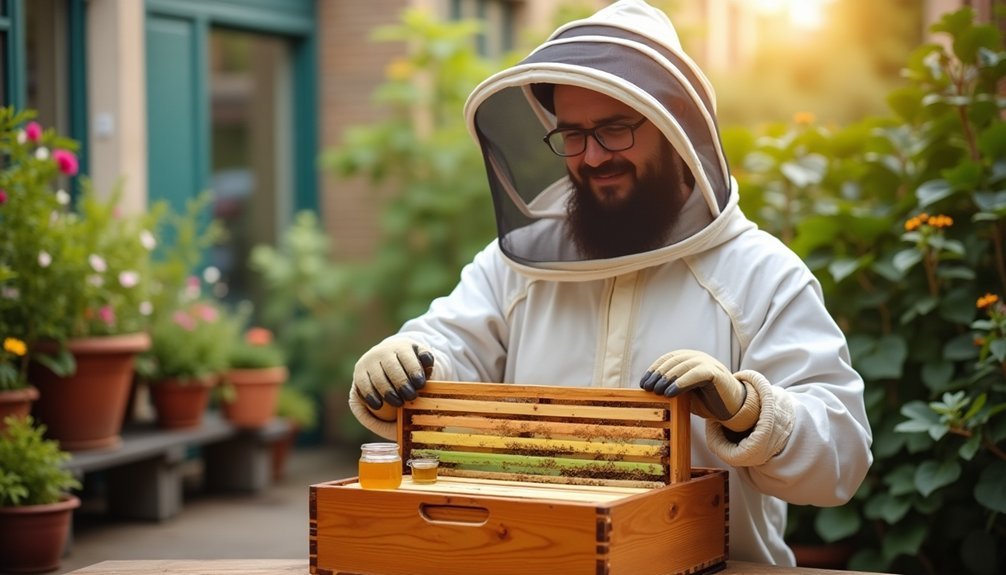
Urban beekeeping demands proper protective equipment, even in compact balcony settings. A well-fitted bee jacket with integrated veil offers the ideal balance of protection and mobility for small spaces, while lightweight gloves (leather or goatskin) protect your hands during quick hive checks.
Choose light-colored gear that's less likely to agitate bees and stays cooler during summer inspections. Ventilated options are worth the investment in city environments where temperatures can soar.
Don't forget leg straps to prevent curious bees from exploring underneath your clothing. Both adults and children can participate safely in urban beekeeping with properly sized suits available in various styles.
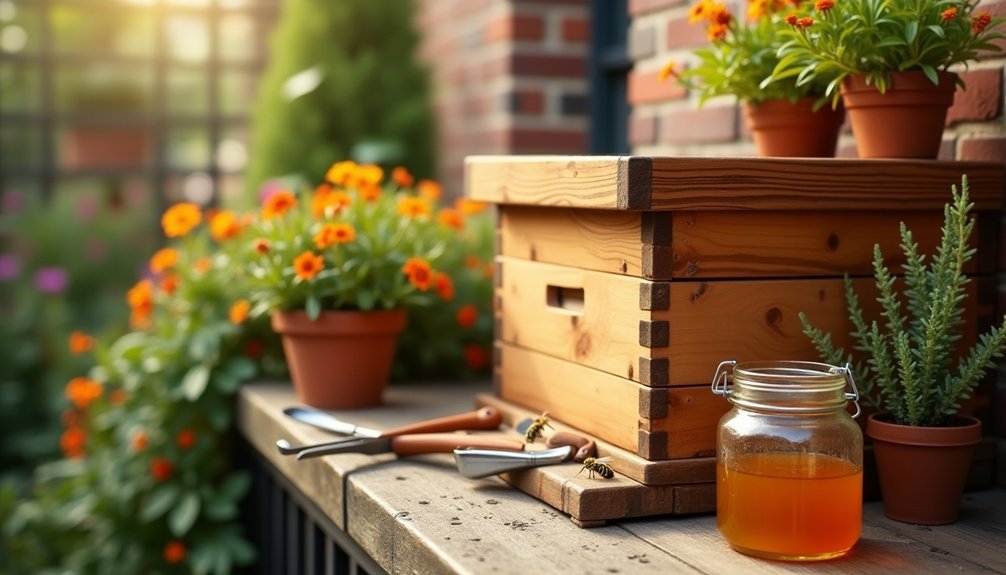
Essential safety tools include a small smoker to calm your colonies, a hive tool for inspections, and a soft bee brush. Keep sting relief wipes nearby just in case.
Regular maintenance of your gear guarantees continued protection throughout your beekeeping journey.
Basic Tools for Hive Maintenance in Limited Spaces
Maintaining a healthy beehive on your urban balcony requires a thoughtfully curated toolkit that maximizes efficiency while minimizing storage requirements.
Start with a quality hive tool—this multi-purpose implement helps you separate frames, scrape excess wax, and perform routine inspections without disrupting the colony.
A reliable smoker is non-negotiable, even in small spaces. Choose a compact model that fits easily in storage when not in use. Pair it with readily available smoking fuel like burlap or pine needles which effectively mask alarm pheromones during your inspections.
Add a soft-bristled bee brush to gently move bees during inspections, and frame grippers to safely handle honeycombs without crushing your bees.
For urban settings, consider collapsible or multi-function tools that serve multiple purposes but take up minimal storage space.
Choosing Bee-Friendly Varieties for Urban Environments
Creating a thriving bee habitat on your balcony goes beyond having the right beekeeping tools—you'll need to select appropriate plant varieties that support your honeybees while thriving in urban conditions. Focus on native flowers that provide consistent nectar sources throughout the growing season. Consider incorporating elements of green roof technology to enhance your balcony's biodiversity potential.
| Plant Type | Benefits | Best Varieties |
|---|---|---|
| Native Flowers | Attract local pollinators | Coneflower, Black-eyed Susan |
| Long-Bloomers | Provide season-long nectar | Lavender, Salvia, Sedum |
| Container-Friendly | Thrive in limited space | Herbs, Dwarf Sunflowers |
| Drought-Tolerant | Require less maintenance | Thyme, Rosemary, Oregano |
| Vertical Growers | Maximize small spaces | Climbing Nasturtium, Honeysuckle |
Choose a diverse mix of these plants to guarantee your bees have access to pollen and nectar throughout the year, even within your limited balcony space.
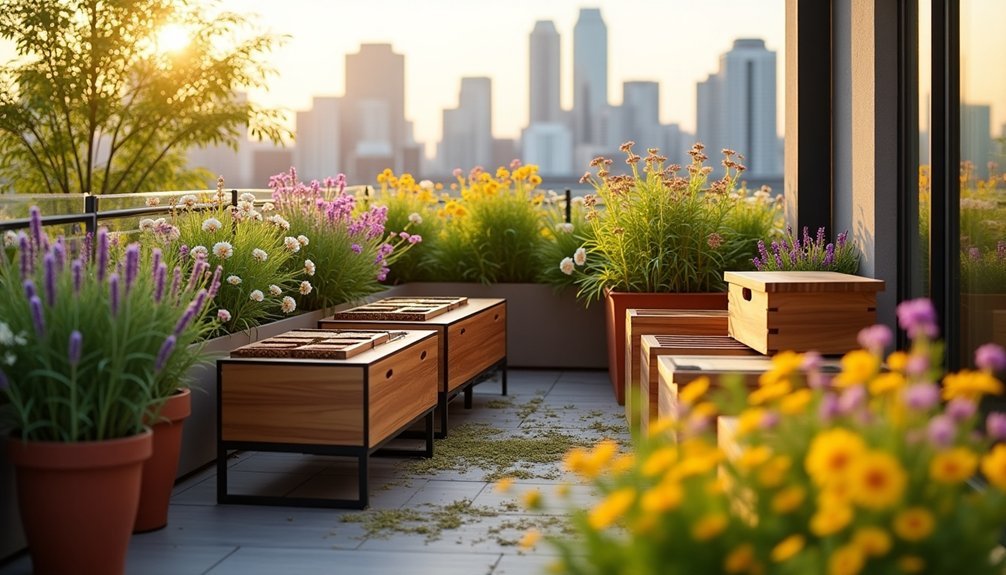
Setting Up Your Balcony Hive Safely
Securing your balcony hive with proper anchor points will prevent accidents during high winds or when you're maintaining the colony.
Position your hive away from direct wind exposure, utilizing windbreaks like decorative screens or potted plants to create a microclimate that protects your bees.
Consider your neighbors by placing the hive entrance away from adjacent balconies and common areas, which minimizes bee traffic near others while still allowing your pollinators easy access to forage. Maintaining positive neighbor relations is essential for urban beekeeping success, as proactive communication can help address concerns before they become problems.
Secure Anchor Points
When you're setting up a beehive on your balcony, the foundation of safety begins with properly anchored support systems. You'll need durable brackets, chains, or straps that can withstand environmental challenges while preventing the hive from tipping over during maintenance or windy conditions. Consider using landing boards at the entrance of your balcony hive to prevent bee accidents and fighting among returning foragers.
| Anchor Type | Best For | Safety Consideration |
|---|---|---|
| Steel Brackets | Heavy Hives | Distribute weight evenly across balcony |
| Weather-resistant Chains | Windy Locations | Must be checked regularly for rust |
| Ratchet Straps | Quick Installation | Require protection from UV damage |
| L-Brackets | Corner Positioning | Need proper wall mounting hardware |
| Balcony Clamps | Railing Attachment | Should be padded to prevent vibration |
Position your anchoring system so the hive's weight is centered on the balcony. Remember to weatherproof all metal components and secure them with locks to prevent theft.
Wind Exposure Mitigation
Bees living on balconies face unique challenges due to higher wind exposure than ground-level hives, making proper wind mitigation vital for colony survival.
Position your hive away from prevailing winds, using your balcony's orientation to your advantage. Utilize the building itself as a windbreak when possible.
Install permeable barriers like lattice screens or fabric windbreaks that redirect airflow without creating turbulence. Secure your hive components with additional fasteners, particularly the roof which can act like a sail in strong winds. Keep these barriers about 2-4 feet away from your hives to ensure bees have adequate flight access.
Consider aerodynamic hive designs that reduce wind resistance.
For seasonal protection, add insulated wraps during winter and guarantee your hive stand is stable enough to prevent tipping.
Regularly check for gaps that might allow cold drafts while maintaining proper ventilation throughout the year.
Neighbor-Friendly Placement
Proper hive placement extends beyond wind protection to include respectful consideration of your neighbors.
Face your hive entrance away from neighboring balconies and install a 6-foot screen to elevate bee flight paths above pedestrian level.
Position your hive at least 15-20 feet from frequently used areas and provide a dedicated water source to prevent bees from visiting neighbors' bird baths or pools. Adding a bird bath nearby will ensure your honeybees have the fresh water they need without venturing to neighboring properties.
You'll avoid many conflicts by simply informing neighbors about your beekeeping activities and addressing allergy concerns proactively.
Consider hosting a small educational session about honeybees or sharing honey harvests as goodwill gestures.
These efforts foster community support rather than complaints.
Remember to check local regulations regarding hive limits and registration requirements before setting up your urban apiary.
Navigating Urban Regulations and Neighborhood Relations
Before placing a hive on your balcony, you'll need to navigate the complex web of urban beekeeping regulations that vary greatly across cities.
Check your local ordinances—many require registration, permits, and specific setback distances from neighboring residences.
Research zoning laws in your area, as they'll determine if beekeeping is permitted on your balcony. Cities like San Diego restrict apiaries with more than two hives to at least 600 feet from homes, while others like Santa Cruz forgo permits but mandate safety measures. Understanding whether bees are classified as livestock or not can significantly affect which regulations apply to your urban beekeeping setup.
Don't overlook neighbor relations. Communicate openly about your beekeeping plans, address concerns about allergies, and educate them on the benefits.
Consider keeping hives discreet and connecting with local beekeeping associations for support. They'll help you understand regulations and provide best practices for urban environments.
Essential Plants for Supporting Balcony Bees
While setting up your hive creates a home for your bees, planting the right flora guarantees they'll thrive in their urban environment.
Group plants with varied bloom times to provide consistent nectar sources throughout the season. Herbs like lavender, oregano, and thyme serve double duty as both culinary ingredients and pollinator magnets. Choosing diverse plants is essential as they constitute 1/3 of agriculture requiring bee pollination for food production.
Smart gardeners select a symphony of blooming plants, ensuring bees feast from spring through fall with herbs that nourish both pollinators and people.
- Vibrant purple lavender swaying in the breeze, buzzing with foraging worker bees
- Clusters of chives topped with delicate pink pom-pom blooms in early spring
- Golden black-eyed Susans standing tall against concrete cityscape backgrounds
- Aromatic mountain mint with tiny white flowers completely covered in native bees
Remember to water regularly and deadhead spent blooms to encourage continuous flowering.
Native plants like anise hyssop and butterflyweed require less maintenance while providing superior nutrition for your urban pollinators.
Seasonal Care for Urban Bee Colonies
Urban beekeeping requires adaptive care as the seasons change, especially in the confined space of a balcony.
In spring, watch for rapid colony growth and provide supplemental nutrition while monitoring for Varroa mites early. Brood rearing increases significantly during this period as day lengths increase, triggering the colony's natural expansion cycle.
Summer demands vigilance for heat management—ensure proper ventilation to prevent overheating. Harvest honey and consider splitting strong colonies if space allows.
Fall preparation is essential: assess colony strength, apply final mite treatments, install entrance reducers, and feed thick syrup to build winter stores.
During winter, focus on insulation while maintaining ventilation to reduce moisture. Perform weekly inspections to check for distress signs and protect hives from wind and precipitation with appropriate shelters.
Year-round, stay compliant with local regulations and connect with urban beekeeping communities for support tailored to city conditions.
Honey Harvesting Techniques for Small-Scale Operations
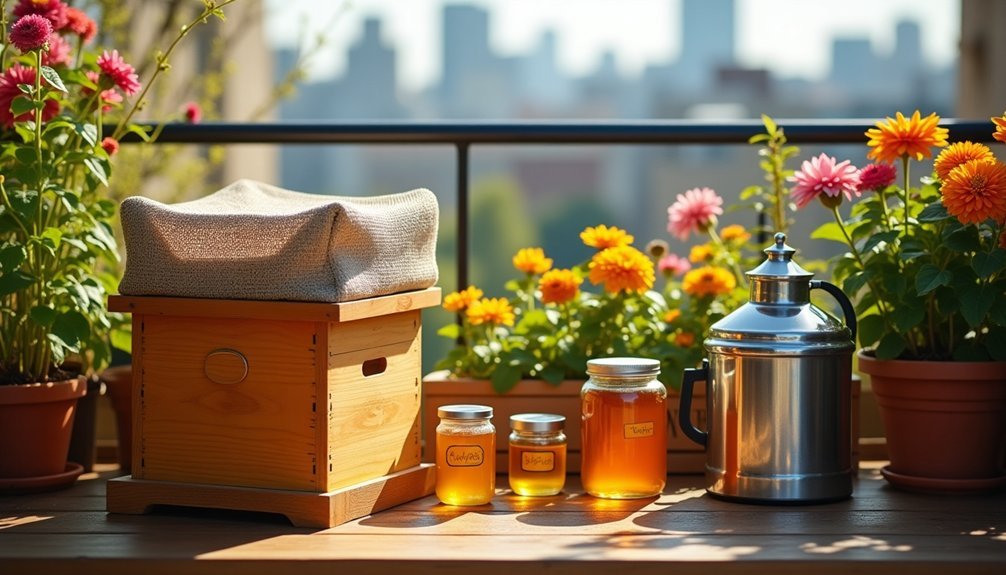
Harvesting honey from your balcony beehive requires careful timing and appropriate techniques to guarantee both quality yield and colony health.
As an urban beekeeper, you'll need specialized equipment scaled for limited space. Wait until late summer when frames are at least 80% capped, indicating the honey is properly ripened. For first-year colonies, consider skipping harvest entirely to allow bees to establish sufficient winter stores.
For small-scale operations, consider these space-efficient methods:
- A manual two-frame extractor sitting on your balcony floor as you gently uncap combs with a heated knife
- A bee brush moving methodically across each frame to clear bees without agitating them
- A kitchen strainer positioned over a clean food-grade bucket to filter your freshly extracted honey
- Clear glass jars catching golden honey as it flows from your extractor's spigot
Budget-Friendly Equipment Options for Beginners
Starting a beekeeping operation doesn't require breaking the bank, especially for urban balcony enthusiasts. Consider 8-frame Langstroth hives, which are lighter and easier to manage in limited spaces.
You'll need basic protective gear—a veil, gloves, and at minimum a jacket with hood—to safely work with your bees.
Look for second-hand equipment from established beekeepers or local clubs, where you might find discounted starter kits. DIY options can further reduce costs—many beekeepers build their own hive components following online plans.
When purchasing new, focus on essentials first: a deep hive box, bottom board, covers, and frames with foundation. The total initial investment may reach approximately $800 for your first year of beekeeping.
Don't forget basic tools like a hive tool and smoker. Pine needles or burlap make affordable smoker fuel, saving you money while still providing effective results.
Community Resources and Educational Support for City Beekeepers
Successful city beekeeping thrives on connection and knowledge-sharing, making community resources essential for both novice and experienced urban apiarists.
Local beekeeping associations offer invaluable support through workshops, mentorship programs, and cooperative initiatives that can considerably reduce your learning curve and startup costs.
Connecting with fellow urban beekeepers transforms novices into confident apiarists while making equipment more affordable through shared resources.
- Join your city's beekeeping association where monthly meetings connect you with mentors who'll guide you through your first colony installation.
- Attend hands-on workshops where you'll practice hive inspections and learn to identify healthy brood patterns in real-time.
- Participate in online forums where urban beekeepers share solutions for common challenges like limited space and neighbor concerns.
- Subscribe to community newsletters that keep you updated on local regulations, swarm alerts, and opportunities to showcase your honey at farmers' markets.
Many of these community networks can help you navigate the process of registering your hives with the Department of Agriculture to ensure compliance with inspection requirements.
Frequently Asked Questions
How Long Does It Take to Establish a Productive Bee Colony?
You'll establish a productive bee colony in about a year. Spring startup allows colonies to grow to 30,000-60,000 bees by summer when they're most productive, assuming proper management and favorable conditions.
Can Urban Honey Contain Pollutants From City Environments?
Yes, your urban honey can contain pollutants like heavy metals, PAHs, and pesticide residues from city environments. However, these contaminants typically remain below regulatory limits, making urban honey generally safe for consumption.
What Are the Most Common Mistakes New Balcony Beekeepers Make?
You'll likely make these common balcony beekeeping mistakes: inadequate space assessment, neglecting neighbor notifications, improper hive positioning, insufficient water sources, and failing to account for urban microclimates that affect your bees' behavior and survival.
How Much Weight Can a Typical Balcony Support With Beekeeping Equipment?
Typical balconies support 50-100 pounds per square foot, but your hives can weigh 80+ pounds when full. You'll need to distribute weight carefully and consult building codes for your specific situation.
How Do I Handle Bee Swarms in a Densely Populated Urban Area?
You'll need to promptly contact local beekeepers for swarm removal, cordon off the area for safety, and notify neighbors. Don't attempt removal yourself unless you're properly trained and equipped.
In Summary
With the right equipment and knowledge, you'll transform your urban balcony into a thriving beekeeping space. Don't be intimidated by space constraints—compact hives, essential tools, and proper protective gear make city beekeeping accessible. Start with beginner-friendly equipment, connect with local beekeeping communities, and you'll soon enjoy your own honey harvest while contributing to urban biodiversity right from your apartment.


Leave a Reply